|
This post contains affiliate links. I will be compensated for any purchases made through those links at no additional cost to you. Thank you for your support! Hey guys, Alicia here. I wanted to share with you guys my first contribution to our Etsy shop, 3WinksDesignShop! I belong to a book club, and during one of our meetings they threw me a surprise baby shower. Another woman from my church made baby blankets, burp rags, and embroidered Sofía’s name on a little blanket for her. Other families from my church brought us a huge bag of baby clothes. One is letting us use their bassinet. I had two other baby showers and countless acts of kindness shown to my family by the people in my life. I was feeling so grateful and I wanted to give “Thank You” cards out to all those who helped us. I also wanted them to have a personal touch. 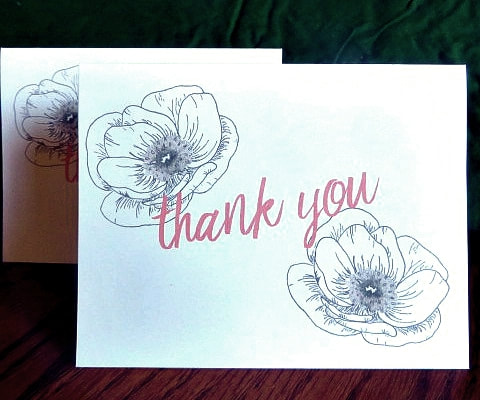 That’s why I designed these cards. And I want to share them with you guys, our readers.  They’re blank inside to provide ample room for writing your sentiments. They’ll look great printed in color or black and white. They also fit two to a page, so you can save paper when you print them. Right now they are on sale for $2.50 as our grand opening price. For that price you will get a PDF file that you can download and print as many times as you’d like. Check them out in our Etsy shop! 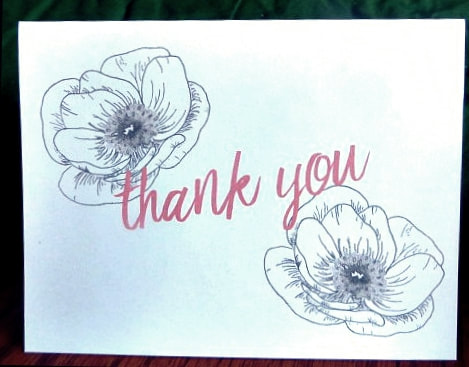
0 Comments
Hey guys Alicia here with a DIY that is easy and fast!
As my due date approached for my second little one (who you met here) the realization hit me that we would have two kids in diapers, and not a lot of space for storage. We live in a very small home with very limited storage space (no closets!), so I needed something that would keep me from tripping over boxes of diapers. I looked online and saw these cute diaper stackers, they could hang from a door hook or on the side of a changing table. But they only hold around 60 diapers! We buy huge boxes of diapers, with at least 200 diapers in the smaller size so I knew I would need something bigger. They also weren’t machine washable. That’s when I came up with this idea of making my own diaper stacker from an old t-shirt. Because it’s from a t-shirt there’s very minimal sewing involved and it’s easy for a beginner 
DIY Hanging Diaper Stacker
Materials:
Instructions:
This post contains affiliate links. I will be compensated for purchases through those links, but they will be no extra cost to you. Thank you for your support.

Hey Alicia here with some fun costume ideas for ya!
Every year I think about what my husband and I should be for Halloween. I can come up with some pretty elaborate or expensive ideas. But most of the time money and life gets in the way of actually pulling these off. So we end up having to do something last minute. Most of these costumes were made within an hour before we had to leave and go to the party we were dressing up for. So I’ve decided to share these ideas with you in case you end up in a similar situation this Halloween. 
Evil Puzzle
You may be giving this costume idea a skeptical side eye but we actually won “Scariest Costume” at a party with this one. To make this costume you will need:
First draw your picture on the foam board. We did a haunted forest. It doesn’t have to be anything too involved. This picture took us about 15 minutes to finish this picture. Then use your black sharpie to draw over your picture the outlines of puzzle pieces. We just did 12 pieces so they can be pretty big. Make sure to have a center line. It’s on this line you’ll use your exacto knife to cut along. You can see in our picture that our two halves fit together like a puzzle. Use your knife or scissors to punch two holes in the top of each half of the “puzzle.” Tie your yarn through the holes measuring enough to have it hang comfortably around your neck. Lastly, use the black eyeliner to draw puzzle pieces on your face. If you’re feeling up to it, fill in Black all around your eyes. This is what my husband did, a la Alice Cooper. Now you’re ready to freak people out as a haunted puzzle. 
Literally the easiest costume and I have two options for you.
You will need:
For option 1 use the white makeup to make your face pale. Use the black makeup to make your eyes look sunken in by basically just putting black all around your eyes. Wear all white clothes and drape the sheet around your shoulders and wear it like a huge shawl. For option 2 just wear the sheet over your head making sure it hangs evenly around your body. Using the black makeup draw a face on the sheet where your face is under the sheet. As you can see from our picture a simple face works great. Additionally, wearing a beanie over the sheet adds to the comedic effect and helps your sheet stay on. It is difficult to see with this costume so you may want to cut some eye holes.
Knock-off Finding Nemo Characters
For our son’s first Halloween, I bought him this little clownfish costume. It wasn’t licensed by Disney so it was just a generic clownfish. So I decided we could go as a knock-off version of Finding Nemo. I called it Looking for Ahab. I went as the off brand Darla, the crazy little girl that terrifies the fish in the tank at the dentist office. To pull this off I wore a crazy sweater, and my hair in pigtails. On my face I drew dental headgear with eyeliner. I even drew dots on my teeth to look like braces. My husband went as a shark. He wore his grey hoodie, which we taped cardboard triangles to as to look like teeth. We also taped some cardboard eyes to his hood. One addition we didn’t have was a fin on his back, which I think would make the costume. Everyone may not be able to tell what you are but at least you’ll have fun. So there you have it, 3 last minute couples costumes for Halloween! What do you think? Do you procrastinate as much as we do for Halloween?
You might also like:
I was compensated for this post. This post also contains affiliate links and I will be compensated if you make a purchase after clicking on my links.
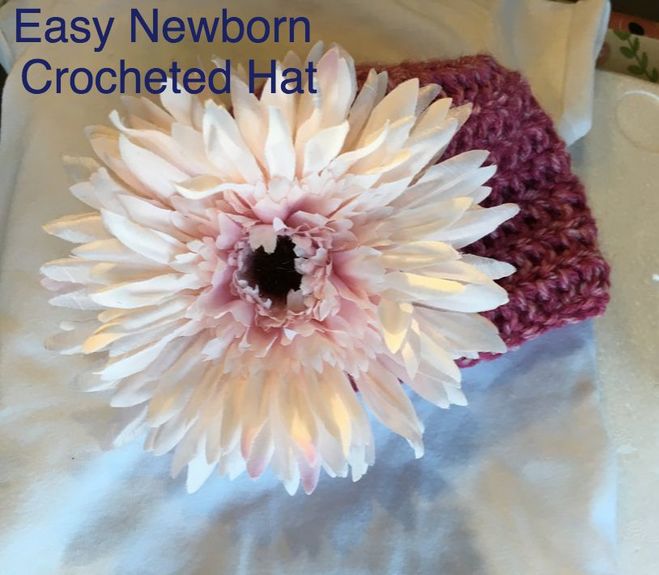
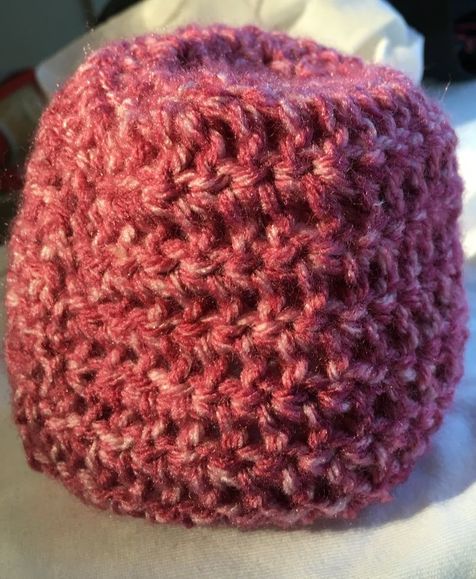
What do you do when you are waiting for a new baby to make her appearance? The showers are over, the due date is past, everything needed to welcome your baby is in place, but she still isn't coming? Well, what I do is crochet!
When Alicia had her first baby, she was early, but I still spent a lot of time waiting while her son was being born. So, I crocheted little booties (not very successfully) and little hats (more successful) for him. So, this time, while waiting for Sofia to make her appearance, I decided to make her some little hats and headbands. I may attempt booties again, we shall see.
I found a cute pattern on Kelley's Yarns that was so simple, and mostly double crochet. The pattern is called Lickity Split Crocheted Newborn Hats. Alicia and I picked out a nice pink variegated yarn and a big flower to decorate it with. (We used Lion's Brand, it is so nice.) This little cap worked up in about half and hour or less and was super easy. I had plenty of yarn in one skein to make some headbands with crochet flowers (a latter post) and another hat for Lindsey's baby. So, we decided to make a little video that shows the simple double crochet that creates this hat! You can check out our YouTube channel (3 Winks Design) here and subscribe and watch all of our videos whenever you want to do that! (Our famous Hot Cocoa Bomb video is on there, and this is a great time of year to start making those as holiday gifts.)
What did you think? Let us know.
Now that we have this little pink cap, let's make it even more girly!
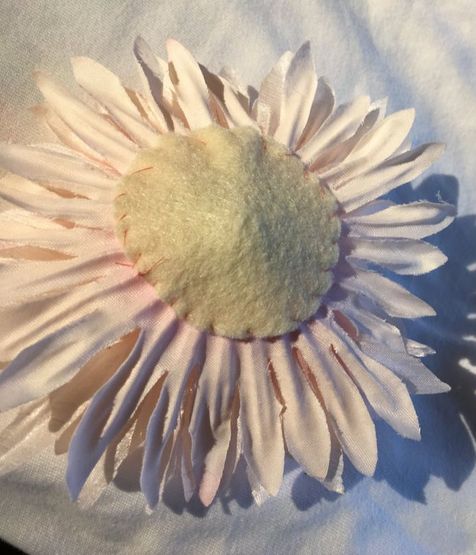
I cut the stem off of this big flower and then stitched a felt patch on the back for extra protection. I don't want anything poking the baby's head! Be sure to stitch threw all of the layers of petals so the flower doesn't fall apart.
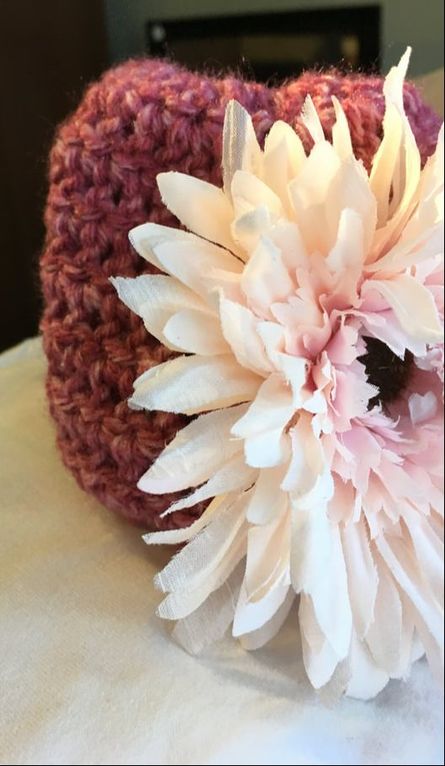
I stitched the flower right onto the hat. We can't wait to see it on the baby!
Update!!! She is here! Watch for Pictures on the next post!
|
Creators of Hot Cocoa Bombs! (copyrighted)

Author
Helen Reynolds: Mother of six children , grandmother to eleven! I love to cook, craft and create things and I especially love doing that with my family, So, when my lawyer daughter, Lindsey, my artist daughter, Madalynn, and I came up with the idea of Hot Cocoa Bombs, this blog was born. Then, one more daughter, with her technical and science skills, plus creativity has joined in to round us out! Read more about us here! 
Click this link and visit 3WinksDesignShop on Etsy. Find our Hot Cocoa Bomb Idea Book, our For the Love of PIe e-book and more of our creations!

Amazon Gift Cards are the Perfect Gift!
    Archives
July 2024
|


 RSS Feed