|
**This post contains affiliate links and I will be compensated if you make a purchase after clicking on my links. But, all opinions expressed are my own.
Hey Alicia here.
We originally posted this recipe last year in May, but I live in a different state and didn't get to try the cake the first time around. So, I made it recently with a giant zucchini my friend gave me from her garden and it was seriously THE BEST CAKE I'VE EVER HAD. It was fluffy, moist, soft, chocolatey, deliciousness. It was light and airy. I wanted to make this cake again before it was even all gone. I especially love that this cake doesn't need frosting. The brown sugar chocolate chip topping was PERFECT! I decided we need to share this recipe again because now Is the time of year when people start finding huge zucchini in their yards that are perfect for baking. Try this, you will NOT regret it. Seriously, I'm considering not eating zucchini any other way from now on. To really make your cake fluffy make sure you cream the butter and sugar really well, until they are light and fluffy and almost increase in volume. Doing this helps to trap air into the batter. Then I repeated this process when I added the egg in (beating it for a little longer to fluff up the wet ingredients). It made it amazing. Go and make this cake and be amazed at the results. You won't regret it! Original Post Below: 
My DIL's mom, Anita gave me a giant zucchini. Yes, we know that the smaller ones are the ones you are supposed to pick to cook up for a delicious dinner veggie. But, if you have ever grown zucchini, they somehow have a way of hiding until finally one day there is a giant one laying there taunting you to do something with it. Anita found this particular one before it had a chance to become extraordinarily huge, but it was big enough for me to make 2 recipes out of it! Today I will share with you the first thing I made with it. It is The Best Chocolate Zucchini Cake Ever!
When Anita handed me the zucchini, she said, "Here! Make some zucchini bread!" I had every intention of doing that and taking her a loaf. But then one afternoon a couple of days later, I looked in the fridge and realized that I needed to use that zucchini and the idea of a chocolate zucchini cake came into my head. I had heard about them before but never made one. I as so glad that I did because this cake came out so moist and delicious, much better than any zucchini bread I had ever made! This particular recipe was adapted from an old church recipe compilation. It doesn't need frosting because it has a brown sugar, chocolate chip topping that is perfect!
Now, here is my secret "oops" moment that caused this cake to be so moist, I believe. I used my food processor to grate the zucchini. I accidentally left the chopping blade down in the bottom of the food processor! What I ended up with was coarsely chopped, slightly pureed zucchini. It was almost like a very thick applesauce, only zucchini. Well, I couldn't waste it, so I went ahead and made the cake anyway! It was an amazing success. I took it to our church choir practice to share it. It was a hit! 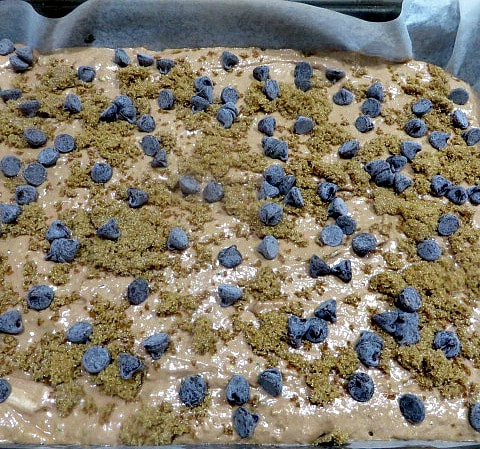
Before baking, you sprinkle on the brown sugar and chocolate chips for the topping.
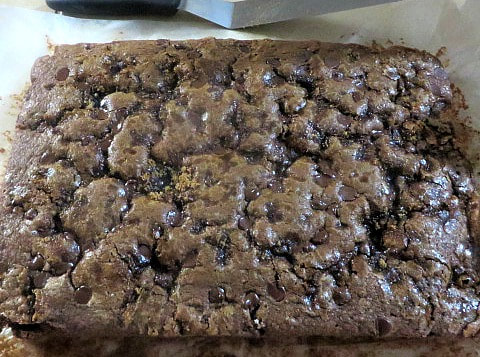
It comes out of the oven looking like this.
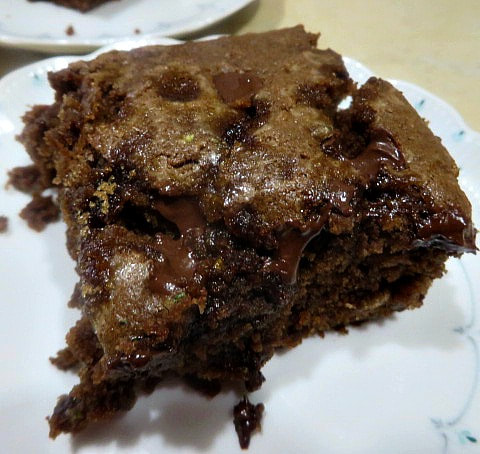
Look at the gooey, chocolate deliciousness!
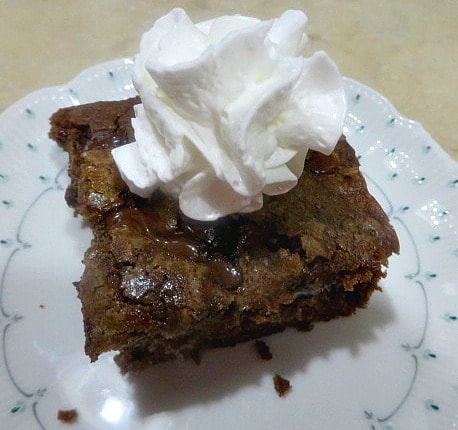
Whipped Cream or Ice Cream can add a final touch.
Even if you don't have a giant zucchini, you can use regular sized ones for this recipe. Later, I will give you the recipe for what I did with the rest of the zucchini!
Have you ever made a silly mistake that ended up making your recipe more delicious? Let me know in the comments!
If you don't have any zucchini at all for this recipe, here is one that Lindsey made for Memorial Day last year!

Strawberry Rhubarb Pie
5 Comments
This post contains affiliate links. I will be compensated for purchases made through those links at no additional cost to you. We do not share your information with other sites. All views expressed are our own. Thank you for your support!

It is very much summer here in Phoenix and I have 2 grandchildren staying with me for most of it. We went shopping for foods that they will eat when they got here and one of the things my granddaughter went crazy about was when she saw the Magical Mermaid ice cream, which we of course purchased. Later, at home, we realized that we had Fruity Pebbles with Marshmallows and Rice Krispys and we decided that we had to make Magical Mermaid Rice Krispy Treats to go with the ice cream. Let me tell you, the Magical Mermaid treats tasted much better than the ice cream, in my opinion. My granddaughter was in mermaid heaven! Not only that, she loved making them with me. Bonus points for Grandma!
I think the mixture of the 2 cereals give these treats a more magical look because the color looks more scattered, plus there were the little bits of cereal marshmallows that were a surprise treasure every so often. Plus, I feel like the fruit flavor from the Pebbles doesn't overpower as much as a recipe with only Fruity Pebbles would. If you want to take the mermaid theme over the top, you can sprinkle on little pearl sprinkles before the treats cool. If you aren't able to see your grandchildren yet, like I am able to at this point, these Magical Marshmallow Treats are the perfect surprise to drop off at their door. They might soften in the heat, but will last pretty well and not spoil. If you have a mermaid lover in your family, make them Magical Mermaid Treats. They will love you for it. 

This post contains affiliate links. I will be compensated for purchases made through those links at no additional cost to you. All views expressed are my own. Thank you for your support!

During this period of the covid-19 pandemic, I have begun ordering and purchasing produce from a local distributor. They have great prices and nice produce and I was even able to get yeast from them! One day recently, I ordered a bag of cilantro. It didn't sound like very much according to the weight of the bag. But, cilantro is very light apparently and the bag of cilantro that I got was HUGE! Knowing how quickly cilantro will wilt and get slimy, I tried to see if my daughters or son needed any. They all refused it, saying they had just purchased some! I started using it in salsa and every recipe possible, but I barely made a dent in that giant bag.
Fast Forward to my grandsons outdoor, socially safe birthday, where I sat having a conversation with Anita and her DL Julia, each 6 feet away from me, and I tell them about my cilantro dilemma! Julia, an excellent cook and baker, suggested that I could put the cilantro in olive oil and freeze it in ice cube trays! Then, when I don't have fresh cilantro in the house, I can just pop a cube of the frozen stuff in my recipe and it will still taste fresh! So, after I got home, I started looking things up about freezing herbs online. Isn't it amazing how many different methods you can find on there? I looked things over, and this is what I did: 
Believe it or not, this tray is holding what used to be 5 cups of cilantro.
I had one spare ice cube try to use to freeze my cilantro! In a food processor or blender, put 5 cups of fresh cilantro, stems and all and 3/4 cups of vegetable oil. If your blender won't hold that much, you will have to chop it in batches. PULSE the blender or food processor until the cilantro is chopped up and covered with the oil. I didn't want it to be a smooth cilantro puree, but to have leaves and bits of stem still showing. Then, I put about a tablespoon of the oily cilantro into each slot of the ice cube tray. I covered it with plastic wrap and put it in the freezer. The beauty of this method is that when it is completely frozen, you can pop out the cubes and store them in the freezer in a plastic bag and then reuse the ice cube tray for something else!
Now, after using 5 cups of cilantro for that freezing project, you would think my problem would have been solved, right? No way, I still had half of the cilantro left! Well, while I had been looking up ways of freezing my cilantro, I remembered noticing herbal salts. Cue binging light bulb! I began with the obvious, Cilantro-Lime Salt. OH MY GOODNESS! THESE SALTS ARE SO EASY TO MAKE AND SO TASTY! I believe I have found this year's Christmas gifts! The possibilities are endless! I am going to give you 3 Cilantro Salt variations. Under each initial photo I will give you ideas for their use and how I have tried them so far. I think a set of 3 types of salts would make a great gift, or use other herbs to make salts, such as basil or thyme from your garden and give a variety of different salts in that way! I used little Rubbermaid or Zip Lock containers to store them, or you could use shakers or canning jars. I also designed labels that I am sharing with you to keep track of what is what and to give them a cute look.

This salt would be delicious in anything Mexican Food! Chicken, pork, or how about corn on the cob? I used about 2 T in a pot of rice (about one and a half cup dry rice to 3 cups of water), it was wonderful!
Cilantro-Lime Salt
Ingredients:
In a large bowl, mix all of the ingredients together thoroughly. Then spread them on a sheet pan that has sides.

Place the pan, uncovered, into your oven set at its lowest heat setting. Leave it there for an hour or two until the cilantro and zest are completely dry. At this point you can start gathering the salt into the center of the pan, crumbling the big pieces of cilantro as you go.

This recipe filled 2 Rubbermaid 4 ounce containers as pictured. Then, I used Avery Address Labels #8160 to print little labels for my salts. Click the button for the PDF to print your own!


When I made the label for this one, I mixed up the onion and the garlic description on it, but you get the idea of why it is called CROG. This salt makes a great rub for any type of meat! I used it on salmon and it was fantastic. A little goes a long way to bring great flavor! I think on a beef roast it will be divine. I am trying that next. It would also be great on vegetables and in rice.
CROG Salt- A savory blend of Cilantro, Rosemary, Onion and Garlic
Ingredients:
3/4 c. loosely packed chopped cilantro 1 bunch finely chopped green onions, green part only 6 cloves finely chopped garlic 4 long sprigs of fresh rosemary, off the stem and chopped 1 c. coarse kosher salt Blend all together in a bowl as before and spread on a sheet pan. Because there are wetter ingredients in this recipe, it will take about 4 hours to dry well in the oven at the lowest setting. When finished, crush up the larger chunks into the mix. The tiny dry onion pieces will burst into powder! I may have had a little too much fun with that. I was able to get almost 3 containers of savory CROG from this recipe. 
Bacon and cilantro together are a perfect combo! Great sprinkled in veggies like beans or on asparagus. I made a breakfast burrito and sprinkled it in my eggs and it was wonderful!
Bacon-Cilantro Salt
Ingredients:
1 c. chopped cilantro, loosely packed 6 slices of crispy cooked bacon, crumbled. Cut off any fatty, not crispy parts. If possible, lower salt would be great. 3/4 c. coarse kosher salt. Like the other recipes, blend all of the ingredients together and spread them on a sheet pan. Dry in your oven with it set on the lowest setting. It took mine 3 to 4 hours to dry completely. Scrap everything together on the pan, crumbling even smaller as you do so. This recipe filled 2 containers.
The measurement of the ingredients is somewhat loose, and you can adjust them as you wish as you make yours. After making these recipes, I was able to bring down the amount of cilantro that I had to a manageable level. If you grow your own herbs or if you have access to a large amount of them like I do from a produce supplier, just think of the possibilities of making gifts this year! It was quick and easy with a great result. Now my mind is racing with other flavor combinations. Also, which containers did you like better? What other flavor combinations do you think would work well? Let me know in the comments!

Hamilton Beach Food Processor
This post contains affiliate links. I will be compensated for purchases made through those links at no additional cost to you. All views expressed are my own. Thank you for your support!

We all know that beets are very healthy! They are high in fiber, vitamin C, iron, potassium and other vitamins. They are associated with lowering blood pressure, filtering your blood and increasing physical exercise performance. There are people who love the sweet, earthy flavor of beets. I am a big fan of their wonderful health benefits. I eat them and I can actually feel the heath benefits when I do. But, I am not a great fan of that earthy flavor that people describe. To me, they taste like dirt when eaten all by themselves, but when you pair them with other ingredients they tend to take on those flavors and are much more palatable. So, because of my desire to reap the health benefits and yet avoid the literally earthy taste, I've found ways to eat beets that make them delicious to me.
Before I forget to tell you this, let me say that not only are the beet roots edible and healthy, their tops are also edible and considered even more healthy than the roots themselves. They have even more vitamins and antioxidants and to my mind (or mouth), taste much better! You can eat them raw or cook them.
Before you get to these beet recipes, you need to prepare your beets. This past week, my son's MIL, Anita, who has an amazing backyard garden, shared some of her homegrown beets with me! I spent the weekend doing things with them. The first thing I did was boil some and roast some. Here are the steps I took:


Sweet Pickled Beets
Refrigerator Sweet Pickled Beets:
3 cooked beets, sliced into half circles 1 c. apple cider vinegar 1 tsp. allspice 1 c. sugar 1/2 tsp. cloves 1 tsp. cinnmon 1 tsp. white mustard seed Combine the liquid and the spices and sugar into a pot and bring to a simmer. Add the beet slices and simmer for about 15 min. Put into a quart jar, making sure to cover the beets with the liquid. Put a lid on the jar and keep in the fridge. These will last for a couple of weeks in the fridge. If you make a larger batch, process the jars in a hot water bath for 15 min.

I began with the ingredients pictured above. I was actually going to use bell pepper instead of the yellow squash, but I was out of them. I think pepper would have been delicious in this dish though. Follow the pictures below to see how I did the rest.
*Just a quick note: When you add the tomatoes, you could also add some chopped beet root. It will turn everything red, but that is not a real problem and the bacon will make it taste good! Continue seasoning to taste.

The colors are so vibrant and it looks so good, you just want to dive right into it now, but wait!

I topped it off with a fried egg! Oh my goodness, what a delight! You can have it with our without the egg, but I am telling you for breakfast or lunch, this plateful of bacon, beets and other veggies is glorious!


It was tall and tasty and the beets made it super moist!
The moral of the story is: Don't be afraid to give beets a try! They really are a super food. I haven't grown them my self yet, but Anita has so much success with them, I think I will give it a try. And, even if you don't like them all by themselves, there are so many other ways to eat them. Besides that, they are so pretty and add a nice color to the foods you will make. Your kids will love them because as you prepare them, the juices will make you look like you are bleeding! Beet juice use is an entirely different article waiting to happen!
Let me know if you try any of these ideas or if you have recipes that you use with beets that you would like to share!
*If you are trying to add more vegetables to your diet, here are some other posts you might enjoy!
|
Creators of Hot Cocoa Bombs! (copyrighted)

Author
Helen Reynolds: Mother of six children , grandmother to eleven! I love to cook, craft and create things and I especially love doing that with my family, So, when my lawyer daughter, Lindsey, my artist daughter, Madalynn, and I came up with the idea of Hot Cocoa Bombs, this blog was born. Then, one more daughter, with her technical and science skills, plus creativity has joined in to round us out! Read more about us here! 
Click this link and visit 3WinksDesignShop on Etsy. Find our Hot Cocoa Bomb Idea Book, our For the Love of PIe e-book and more of our creations!

Amazon Gift Cards are the Perfect Gift!
    Archives
June 2024
|


 RSS Feed