|
**This post contains affiliate links and I will be compensated if you make a purchase after clicking on my links. But, all opinions expressed are

Today's post will be educational as well as delicious! As you can imagine, there is a story behind how this post came to be. Here it is.
My husband and I were watching PBS the other night. There was a special on about Fall in New England. As part of the special, we learned that when the pilgrims made pie, they didn't have much flour at the time for a pie crust, so they would bake custard right inside of the pumpkin. Then, they would slice the pumpkin in pie shaped wedges. Their pie had a spiced milk custard in it and the pumpkin was still just like the squash that it is and you would get some custard and pumpkin all at the same time when you took a bite. Well, loving history like I do, I decided that I needed to try this method and of course take it a step further. Why not put actual pumpkin custard inside the pumpkin? So, I went to the store and not only did I find pumpkins for pie, but some other really great squash that I knew would work as a substitute for pumpkin if I wanted. Click on or hover over the pictures for descriptions.
Then I saw the Turban Squash! I was sold on that guy! He just looked ready to be my pie!

I knew I could cut out that top part and fill the squash with filling!
The directions on the Turban squash said to bake it at 350 degrees for an hour. I decided to try that without cleaning it out first. I did clean out the smaller pumpkins and baked them without seeds. What happened is the pumpkins and carnival squash were done after around an hour. The Turban Squash took 2 hours.
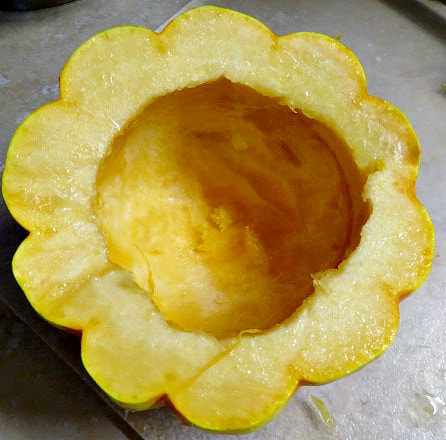
Here is how the Carnival and Turban squashes looked after being baked. The Carnival squash browned a little more than I would have liked, but it is okay. In retrospect, I could have taken them out a little sooner, I will explain why in a moment.
That is the Turban Squash after I cut the top off of course. It was so nice and tender inside and the seeds pulled out very easily. Then, I scooped out the flesh into a bowl to use as the "pumpkin" puree.
At this point, I decided to fill the shells 3 ways. In the little pumpkins, I used the vanilla custard. This is when I learned that I had baked the pumpkins a little too long because they developed leaks in the bottom and I lost some of the custard. This is the recipe I used:
You can see in this picture that some of the custard leaked out, so it didn't end up as full as I had hoped. I also feel like it had baked a little too long. So, this is something you will need to watch, but this was an experiment and it was okay. It tasted pretty good anyway.

You can see where it leaked. I lost one pumpkin altogether. If this hadn't happened, the custard recipe would have filled 2 small pie pumpkins.
In the Carnival Squash, I decided to make Maddy's Vegan Pie. She liked it, even though she doesn't usually like squash. I thought it was cute to serve it with the lid on.
Oh! And one thing I forgot to mention in the recipes is that I put a pan of water on the bottom shelf of the oven when I baked these.
For the Turban Squash Pie, I used the squash puree and followed our normal pumpkin puree recipe to make the filling. You can find that recipe here. Here is how that pie turned out. If you hover or click on the pictures, there are descriptions.
One thing I wanted to mention about the Turban Squash is that I think it would be an awesome squash to bake a stew in! You wouldn't need to bake it as long as the pie had to bake and getting that bite of squash mixed in with your stew would be delicious. Doesn't that sound like a great Fall dish? I may have to try that and let you know how it goes.
In the end, this was an interesting, educational and time consuming project. I think it would be great to use this method with kids as part of a Thanksgiving history lesson. Also, it was really fun discovering a new, super cool looking squash like the Turban and a cute one like the Carnival! But, when all is said and done, I am really thankful that I have the flour and the means to make pumpkin pie the way we do in our day! Remember, the custard recipes I have given you can also be baked in a custard dish or regular pie shell.
Speaking of pie, if you haven't yet gotten your copy of For the Love of Pie, you can still get a 20% discount through tomorrow with code PIESPECIAL! Don't miss out, because after tomorrow the price goes back to normal. In this special e-book all about pie, you will learn how to bake not only Pumpkin Pie, but many other pies not already published on this blog. Some are original pies, invented by us that we are sure you will enjoy! Be sure to check it out!

3 Comments
**This post contains affiliate links and I will be compensated if you make a purchase after clicking on my links. But, all opinions expressed are my own.  First of all, thank you thank you thank you to everyone who attended our Pie NIght either in person or virtually! We appreciate you so much and it was a lot of fun. I hope that if you attended virtually, you still got to eat some Pie! If you didn't, we will be announcing this week when the e-book will be available! Then you can bake your heart out and eat all of the pie you would like. Of course, one of the pies we enjoyed at our Pie Party was good ol' Pumpkin Pie! LIndsey loves that of course, and so do the rest of us, loaded with whipped cream! But, pumpkin isn't just for pie or other sweets. It is, after all, a squash, which makes it a vegetable, and pumpkin is very good for you. (That is how I justify eating pumpkin pie for breakfast!) The other week, I made No Bake Chocolate Pumpkin Cheesecake. That recipe didn't use a whole can of pumpkin and I didn't want the leftover pumpkin to go to waste. Besides, with all of the pie baking I have doing around here, something with less sugar and savory sounded perfect. So, I came up with this baked chicken recipe that fit the bill. (I know, ducks have bills, not chickens! ha ha.) This is the type of recipe that tastes even better on the second day, so be sure that you make enough for lunch tomorrow!  I had 2 whole chicken breasts that I cut into 8 serving sized pieces. These were large chicken breasts and cutting them up still left very nice sized portions.  The sauce was really good and I kind of wished I had served it over rice. So, you might like to try that. Keep your eyes peeled for the announcement of our PIe E-book going on sale! We know you will be pleased and that there are pies in there that anyone can make and enjoy if you are a novice pie baker! Then there are a few that require a few more steps for when you are more ambitious.  Beau-coup has tons of lovely little things to help you get ready for Thanksgiving!
**This post contains affiliate links and I will be compensated if you make a purchase after clicking on my links. But, all opinions expressed are my own.
Hello! Alicia here with a recipe my family loves! I'm taking October to share recipes we make often in our little family. So no specific country this month, just family recipes that keep us coming back for more!
Today's recipe is one that everyone clears their plate without having to be told to take a bite. My three year old is one of those kids that will take two bites and say he's done. He just loves to play. But this meal he actually asks for more and eats more! It's easy and delicious and you can easily make it vegetarian or vegan. Mushroom "Risotto"
I put risotto in quotes because I'm not sure how authentic this risotto is. But it's super delicious. I adapted this recipe from a cookbook I bought in college: $7 a Meal Healthy Cookbook. The prices may be a bit more now (inflation) but the recipes are still delicious. I have changed the recipe a bit to suit what I have on hand at the time. I've used all different kind of mushrooms, onions, and cheese. The original recipe calls for vegetable broth, but I use chicken. And instead of wine I use a splash of white wine vinegar and water.
One thing I don't like to skip (though it is still good without it) is the squeeze of lemon juice at the end. It just adds a brightness that really amps up the flavor. Another thing is I have only made this with white cheese, usually Parmesan. I can't see mushrooms going well with a cheddar flavor but you can try it. 

It's hard to get a picture of it that really tells you how good it is but trust me, this comes out so creamy and delicious. You have got to try it. When a 3 yr old boy is asking for seconds you know it's great. And because you can substitute in lots of things, it won't break your budget!
**This post contains affiliate links and I will be compensated if you make a purchase after clicking on my links. But, all opinions expressed are my own.

Saturday was a leisurely morning for my husband and I. When we woke up, I went into the kitchen to make a nice breakfast. Since I had some sprouted wheat flour all ready to go, I decided to make these yeasty Angel Biscuits with it. Usually they should rise for about an hour before baking. I only gave mine about 30 minutes as I prepared everything else, but they were still delicious, if not as high. You can actually make this recipe with white flour, but something about using sprouted wheat makes it feel okay to eat 3 (or 4) of them in a row!
Click on the recipe for the printable pdf! 
I hope you give these a try!
|
Creators of Hot Cocoa Bombs! (copyrighted)

Author
Helen Reynolds: Mother of six children , grandmother to eleven! I love to cook, craft and create things and I especially love doing that with my family, So, when my lawyer daughter, Lindsey, my artist daughter, Madalynn, and I came up with the idea of Hot Cocoa Bombs, this blog was born. Then, one more daughter, with her technical and science skills, plus creativity has joined in to round us out! Read more about us here! 
Click this link and visit 3WinksDesignShop on Etsy. Find our Hot Cocoa Bomb Idea Book, our For the Love of PIe e-book and more of our creations!

Amazon Gift Cards are the Perfect Gift!
    Archives
June 2024
|


 RSS Feed