|
This post contains affiliate links. I will be compensated for purchases made through those links at no additional cost to you. All views expressed are my own. Thank you for your support!

I have told you about the wonder that is the air fryer previously. I shared this amazing chicken chimichanga recipe with you. I really love our air fryer, especially in the summer when I don't want to turn our oven on.
I know a few places got some snow last week (what?!?!?!) but here in the valley of the sun, we're getting that summer sun nice and strong, and the last thing anyone wants is their oven heating up their house and ramping up their energy bill even more. The air fryer cooks things so quickly and the house isn't hot! It is perfect! 
The other day I asked my daughter what she wanted for lunch and she cheerfully announced, "PIZZA!" We didn't have any frozen pizzas, and I didn't want to order out from anywhere. Homemade pizza sounded fun, but it was lunch time already and I was working so I couldn't really take the time to make the dough. I thought to myself, "I bet I could throw it in the air fryer for a few minutes."
I improvised and used our pie crust recipe and then topped it with a little tomato paste that I thinned out a bit and seasoned, and threw some cheese on there. It was like an upgraded take on a Lunchables pizza because it wasn't a regular crust, but the sauce wasn't nasty and the cheese was nice and melted. She loved it and I thought, "I bet I could make us a real pizza in the air fryer." I mean, I love our easy, flakey, fool proof pie crust, but it isn't the same when it comes to pizza! Well as you know, my mom has shared our pizza crust recipe on here as well! I have tested it out using Bob's Red Mill Gluten Free flour blend (I get the 1 to 1 with the xantham gum included) and it still turns out really nicely for a pizza crust. You can buy Air Fryers in many different sizes, and I've linked to some at the bottom of this post. Ours isn't quite big enough for any of our pans to fit other than my 6 inch round cake pans (I ordered a pizza stone from a Pampered Chef party recently and I'm waiting for it to get here to see if it fits!) So we ended up making mini personal pizzas. It was a hit. My daughter had fun helping me "decorate" the pizzas, so we got some fun bonding time together as well. The air fryer pizzas were so fast to bake and the cheese was perfectly stretchy. Here is the recipe I used for our toppings, pretty basic but still delicious. Let me know what toppings you decide to do! 
Pizza Crust
Use our pizza dough recipe found here. To make it gluten free simply use the Bob's Red Mill Gluten Free Blend and use the same flour ratio. Pizza Topping: 1 can tomato paste 1 tsp salt 1 tsp pepper 1 tsp garlic 1/2 onion powder 1 tsp italian seasoning Mozzarella cheese parmesan cheese 1/2 green bell pepper chopped pepperonis Empty out the paste into a bowl. Fill the tomato paste can with water and mix into the paste to make it thinner. Add seasoning and blend well. Spread your crust out into the bottom of your pan, making sure to leave a raised edge. Take a spoon and spread the sauce until the bottom of the crust is covered. Sprinkle with mozzarella and parmesan cheese. Top with bell peppers and pepperonis. Place pan in your air fryer and bake at 330 degrees fahrenheit for 8-10 minutes. Remove pan (it will be hot!) remove pizza from pan and place on plate. Enjoy!
4 Comments

Hello everyone! I am here with the perfect lemony recipe for these hot summer days. (Is it hot where you are? We are sweltering here already.)
I love lemon desserts because even though it is boiling lava hot outside, if I have a bite of a tangy, lemon dessert like this Lemon Curd Tart I just feel light and refreshed. Have you ever made lemon curd before? It's pretty easy to make. If you make this lemon curd recipe and don't want to put it in a tart, skip the gelatin part. I just added that to make sure the curd would be perfectly set. The other great part of this Lemon Curd Tart is the Coconut Flour Crust. As you well know, we have a great pie crust recipe. I am loathe to try any gluten free pie crusts because the few times I have previously, they did not turn out well. I like this coconut flour crust because you press it into the pan instead of having to try and roll it out in advance, which is when all the gluten free crusts I've tried have fallen apart and ended up in the trash. I felt like the coconut crust was the perfect compliment to the lemon tang, and it wasn't a strong coconut flavor so it was a perfect balance of flavor. My husband was happy because he could actually eat a slice instead of just trying to get the middle like I usually make him do. This Lemon Curd Tart recipe is going to become a summer staple in our home, and I think it will in yours as well! 
This post contains affiliate links. I will be compensated for purchases made through those links at no additional cost to you. All views expressed are my own. Thanks for your support!
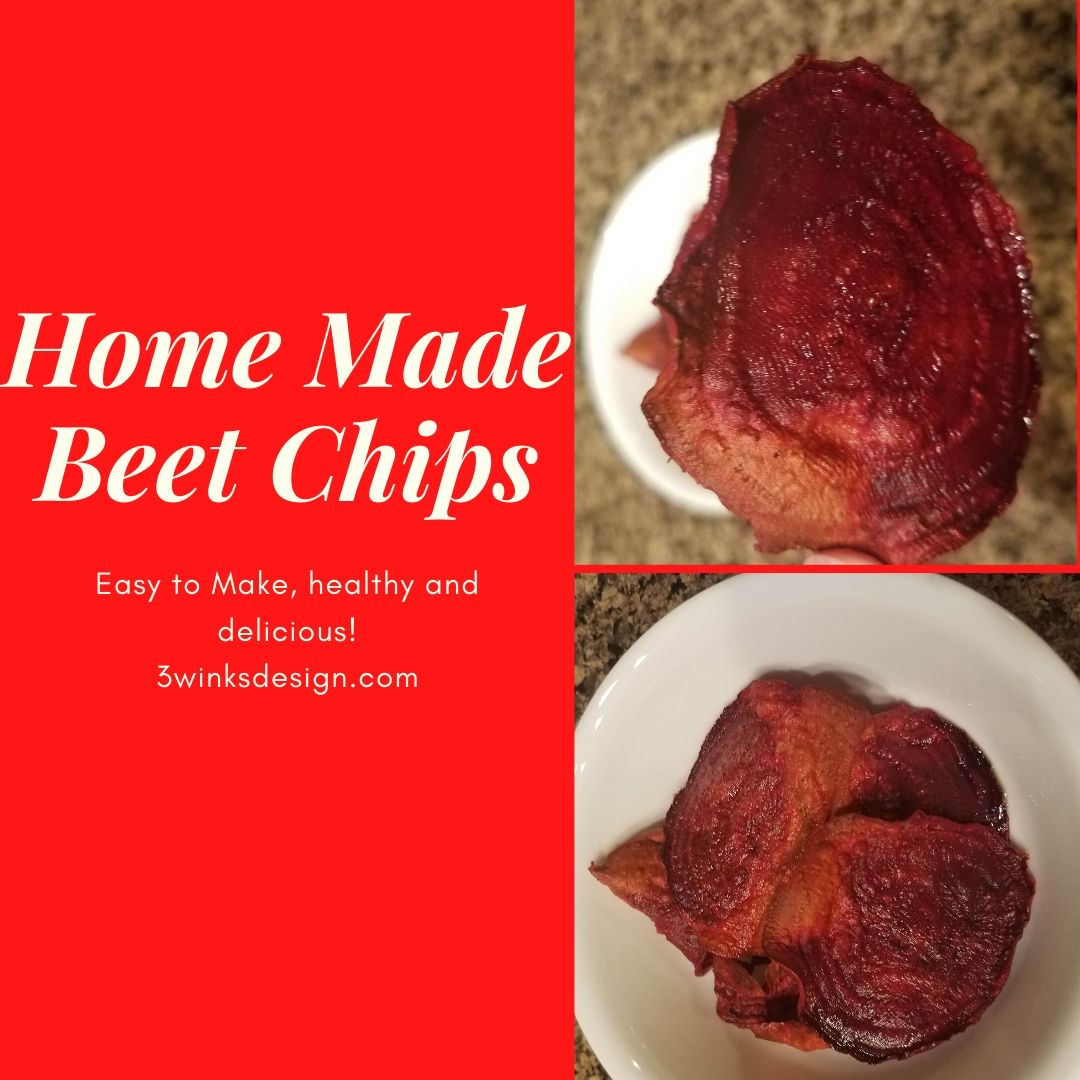
Hey everyone! Remember a couple weeks ago when my mom did this post about beets? She gave you lots of different ideas for how to eat your beets. Well, my SIL's mom's garden was still exploding with beets, so when we went to our nephew's social distancing birthday party at her house, she was giving away beets, and we took one. She also had some beet chips she had made in her air fryer. Veggie chips are all the rage these days, and they're really so easy to make! If you remember from posts like this one, we also own an air fryer. So I decided to try my hand at making my own beet chips! It was really so easy! For this recipe there are a few kitchen gadgets you will need. I've linked to them at the bottom of this post so you can get everything you need to make your own beet chips. You'll need a mandolin to slice the beets nice and thin. Then, mix together the following ingredients: 2 TBSP oil (I used olive oil) 1 tsp salt 1 tsp black pepper Toss your beet slices in the oil mix. Place in your air Fryer and cook at 320 degrees for 25 to 30 minutes. Stop every five minutes to toss the beets to make sure they're evenly cooked and they don't get burned. That's all you need! You can store your beet chips in an air tight container. Mine have kept for about a week and a half now, and they're a nice, fresh treat whenever you want something crunchy and delicious! Follow the links below to make sure you have everything you need to make your own beet chips and start enjoying them today! This post contains affiliate links. I will be compensated for purchases made through those links at no additional cost to you. All views expressed are my own.Thank you for your support!  Good morning! I hope everyone had a wonderful weekend and Mother's Day!
I know that in some parts of the country people are still getting hit with snowstorms, but here in Arizona the temps are heating up. I am grateful for our swimming pool, and I am also grateful for smoothies! Not only is it hot, I am pregnant, so, It's super hot. A nice cool smoothie is a great way to get the nutrients I need and not die from the heat. I love buying up frozen fruit so I can toss it into my Ninja and enjoy a nice, thick smoothie. I've made several different kinds, but this breakfast smoothie was so delicious I had to share it with you. It was so thick it was like eating sorbet, but healthier! For this delicious breakfast smoothie you will need: 1 orange, no peel 1 banana 1 cup frozen mango 1 cup frozen pineapple 1/2 frozen chopped spinach 1 cup almondmilk Toss all of those ingredients into your Ninja or your Blender, or your Bullet, or whatever you use to blend up a smoothie and blend until smooth. That's it guys! That's how easy it is to make this tasty meal! I am about to go make myself another one, so enjoy! Use our links to buy your new favorite kitchen gadget! I love my Ninja because it really gets everything so nice and smooth so quickly! Don't forget to buy it and try! Happy, healthy, breakfasting! |
Creators of Hot Cocoa Bombs! (copyrighted)

Author
Helen Reynolds: Mother of six children , grandmother to eleven! I love to cook, craft and create things and I especially love doing that with my family, So, when my lawyer daughter, Lindsey, my artist daughter, Madalynn, and I came up with the idea of Hot Cocoa Bombs, this blog was born. Then, one more daughter, with her technical and science skills, plus creativity has joined in to round us out! Read more about us here! 
Click this link and visit 3WinksDesignShop on Etsy. Find our Hot Cocoa Bomb Idea Book, our For the Love of PIe e-book and more of our creations!

Amazon Gift Cards are the Perfect Gift!
    Archives
July 2024
|
 RSS Feed