I am in my new house and although unpacking is slow going, I am excited about being there. Now I can get back into cooking in my own home, and I decided to go big this week.
I have been wanting to try a cauliflower pizza crust for awhile now, and I decided that this was going to be the week that I did it! Additionally, we moved into a house that already had a garden at the side of the house. A garden with tomato plants, and so I decided with the plethora of cherry tomatoes we now have in our refrigerator that I would make my own tomato sauce. You are free to do that as well, or you can buy the canned stuff if you prefer. 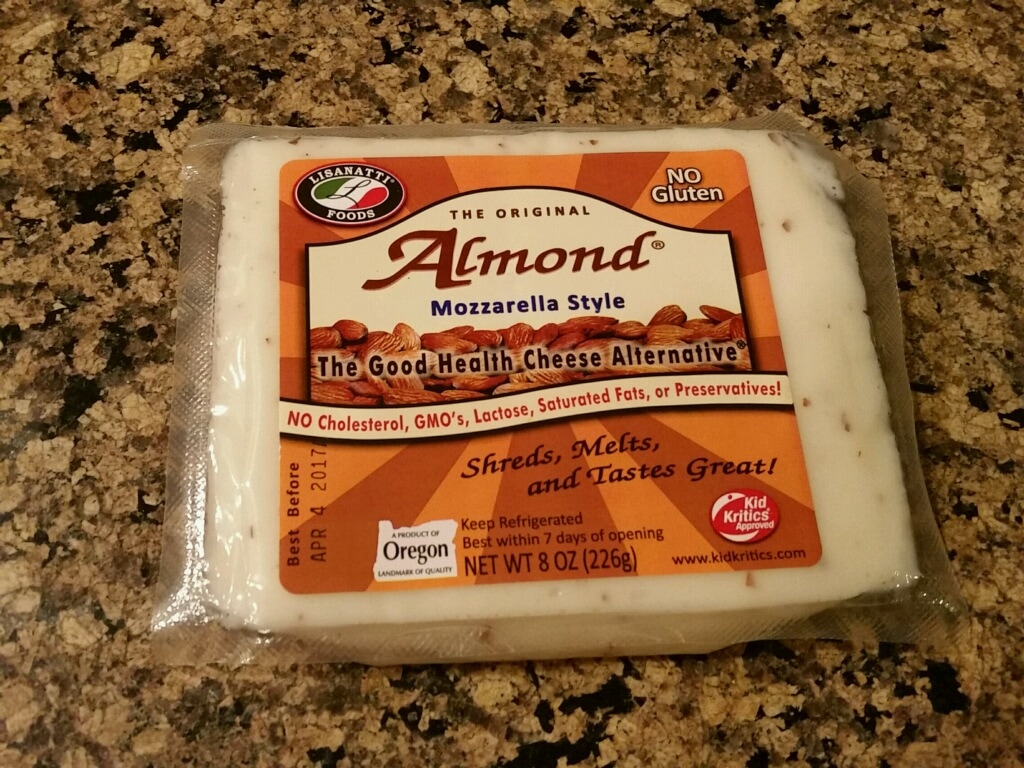
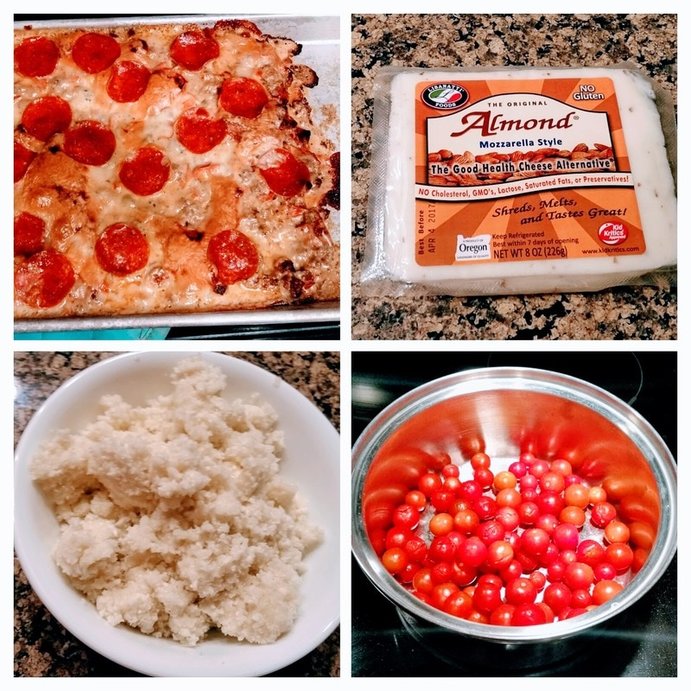
A struggle that I have in our home is that PH is lactose intolerant. I'm always trying to find cheese alternatives for him. I decided to pick up this brand of almond milk cheese. It is pretty tasty, but warning, you cannot shred it! It was way too soft and I had to just break it into globs to place on top of the pizza before putting it in the oven.
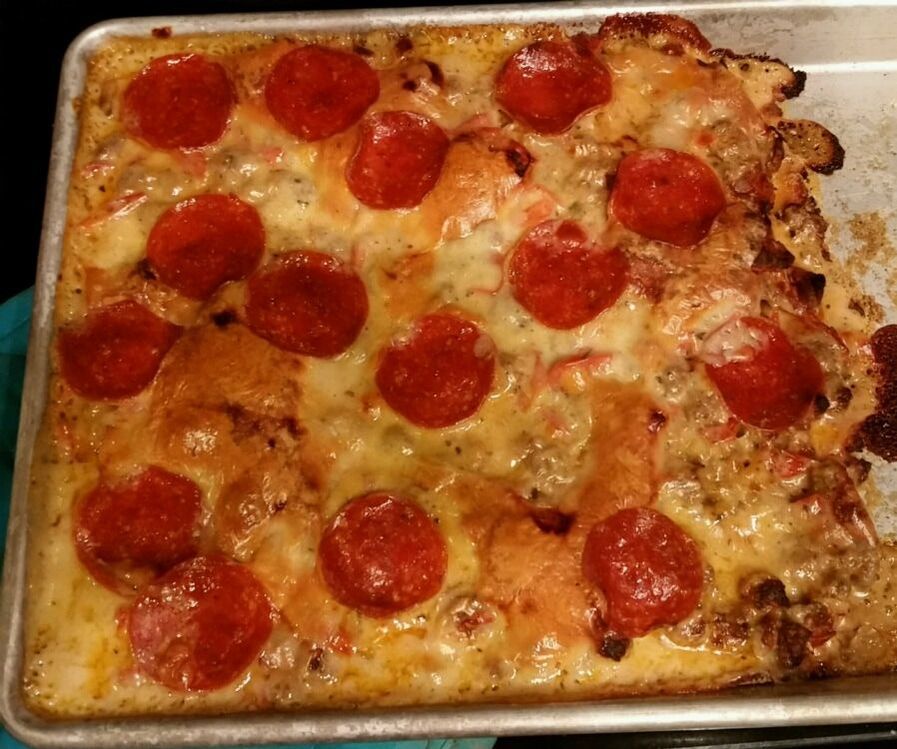
My pizza didn't end up taking up the entire pan. Now, I used regular pepperoni and I also added Jimmy Dean's Turkey Crumble to the sauce. If I had it to do over again I wouldn't have added as much turkey. The pizza ended up being way too salty because of it.
I would also suggest cooking the cauliflower crust by itself and then adding the toppings and cooking until the cheese melts. I felt like my crust was just a little too soft and I think cooking it on it's own first would help with that (plus, I probably needed to wring more water out of the cauliflower!) The taste of the crust was good though. Honestly, PH and I were distracted more by the over saltiness of the turkey, which I have left out of my recipe. I mean, this was more like a meat pizza you know? I didn't add any veggies, but you totally should, because that would just make it even healthier! So, get to making your healthy pizza and let me know what you decide to top yours with!
9 Comments

So, you've put the time and energy into sprouting your own wheat and grinding it into flour. Did you do all of those steps just to make 1 loaf of bread? I think not! I decided that this time I would make a large batch of bread and freeze some so that we would have it for a while before I went through the entire process again. It isn't a difficult process, but lets face it, large batches are just as easy to make as small ones and that is a good use of time and energy. I gave you a single batch recipe here. I mean, that would be great for people with those single loaf bread machines and maybe one person or a couple. But, for more people than that, a larger batch of bread just makes sense.
The recipe I have will make 6 loaves of bread. Since I promised to share my glitches and all today, here is glitch #1. I only have 5 loaf pans. I made 5 loaves from this recipe so consequently my loaves came out humongous! I should have just done one loaf free form or made it into rolls. It didn't alter the taste at all, but I had to bake these loaves much longer to make sure that they were done in the middle.
To make such a large batch, you need a large bread machine, or Bosch. It looks like this.

Of course there is a lid as well. This is a knock off brand that works great! There are many varieties of machines like this.
My recipe for this large batch of bread gives the exact order that the ingredients are to go in the mixer. It may seem a little different from other bread recipes, but the results are amazing. I adapted this recipe from one given to me by my good friend Tracy Moore. Click on the button for the recipe.
Now it is time for glitch #2. If you will remember, in yesterday's post, when I told you how to sprout the wheat, I told you that I had sprouted 9 cups of wheat. One of the videos I watched had informed me that one cup of wheat would make about 1 1/2 cups of flour. Like a goofball, I didn't check my recipe first and I just assumed that 13 1/2 to 14 cups of flour would be plenty. It wasn't. This recipe starts with 8 cups of flour and then by the end you add 8 or 9 cups more. Luckily, I had a little bit of the King Arthur Flour left over that I was able to combine with my own self-sprouted flour. But, in the end, I had to add about 3 cups of all purpose flour to get the right consistency of dough. So, for all of you purists out there, I am sorry! But, because I have done this before with the one loaf recipe, I know that the results with just the sprouted wheat flour are amazing. There is plenty of sprouted wheat flour in this batch to give us great health benefits, so I am not going to feel badly about this mistake. Next time I will either sprout more wheat or make a slightly smaller batch.
The really nice thing about using a bread machine like the one I used is that there is no kneading needed! (Say that 3 times real fast!) You let the machine do the work for you for as long as it takes to get a stretchy, not too sticky dough. Then, you roll it out onto an oiled surface and divide it into your pans.
I covered the pans with a towel and let them rise. I figured that they would take an hour or and hour and a half to double in size. But, in 30 min., Madalynn went into the kitchen and asked, "Mom, when are you going to bake these?" I replied, "When they double in size." Then I looked and she looked at me wide-eyed because they were already large and bulging up over the pans. That was fast! I quickly heated the oven up to 350 degrees and popped them in. As I said earlier, I had to bake them a little longer than the recipe calls for because they were such huge loaves!
Once, my friend Rhonda, who got me interested in the sprouted wheat technique, told me that the first loaf you cut into is the sacrificial loaf that everyone eats right away. Just like the story of the story of the Little Red Hen, there are always plenty of people ready to help sample the bread when it comes out of the oven! It is a good thing that around here they are willing to help, too. The butter and honey spread on the warm bread is hard to resist.
As I mentioned in the 1 loaf recipe, it is hard to believe how light and fluffy this bread is and what a mild flavor it has. Combining that with the health benefits of sprouted wheat makes this the perfect bread! I call that a great use of time and energy!
Here are some other bread posts you might enjoy!

My Friend, Rhonda, has been making sprouted wheat flour bread for her family for a few years now. While her bread tastes really good, when I heard the process I thought, "No way!" It sounded so time consuming and took so many steps! Then, one day she brought me a bag of King Arthur Sprouted Wheat Flour. I made the bread in my Kitchen Aid, and talked about it a little over a month ago on this post. It was some of the best bread I have ever made, and I was converted. I decided that I had to learn and try the process of making my own sprouted wheat flour.
Rhonda was ready for me when I approached her. She had sheets of information and a cookbook to help me learn. She even loaned me a dehydrator in case mine wasn't large enough. The Cookbook she loaned me is called, The Diet Rebel's Cookbook, by Jillayne Clements and Michelle Stewart. You can order it at that link in paperback or on your Kindle. It holds a fountain of information for "eating clean and green" . I used it as a reference, as well as the info Rhonda told me and from all of the YouTube videos I watched in preparation for trying the process.
To begin, you need whole wheat berries. I happened to get a really good deal on some from Costco the other day. But, from what I understand, not all Costcos carry it. I found something that looks very interesting on Amazon here, but there are a myriad of sources to order whole grains from. In my first blog post about baking bread with sprouted wheat flour, I listed some of the health benefits that you get by using this method. Since that time there are a few other things that I have learned. One of the main things I have learned is that all grain contains phytic acid in its bran. Phytic acid reduces our bodies ability to absorb nutrients from the grain. So, when we think we are getting all of these great vitamins from eating whole grain foods, we are actually only absorbing 80% of what we think we are getting. For a fascinating article about why in modern times there are more grain allergies in the USA, read this on Wellness Mama. Do not despair! Soaking, rinsing and sprouting your grains reduces the phytic acid and allows you to absorb and more easily digest the whole grain. So, that is STEP 1: Soak and rinse your grain.

First, soak your grain. I have heard a variety of amounts of time to soak, all of the way up to 24 hours. I forgot about the soaking step until after I was into the process! I did soak it for about 5 min. Then, I put portions of it at a time into a wire colander and rinsed it well. Oh well, next time I will do better.
After rinsing the grain, I put it in a big metal bowl lined with a wet towel and covered it with the wet towel. Please realize that this is my first time doing this process and in retrospect, I should have perhaps used a large colander to sprout in, but actually, the bowl method worked well for me. At this point, I just left the bowl on my counter to do its business and I went about the rest of my day. Except, after about 3 hours, I dumped the wheat out of the towel into the bowl and I rinsed and drained it. This time I just put the damp towel over the top of the wheat. I did the rinsing and draining 2 more times before I went to bed that night. Just before going to bed, I began to see the ends of the wheat start to look like it might be beginning to sprout! I decided I would let it sprout over night and see how it looked in the morning.

Look! Do you see those little sprouts coming out of the ends of the wheat kernel? That is what you want. You don't want huge sprouts because it will not make flour that will hold your bread together when you bake it. These little berries are soft and tasty at this point, so don't snack on them all or you won't have enough to grind into flour.
Step 2: Dehydrate
I sprouted about 9 cups of wheat. I was able to fit all of that in my dehydrator. I have had my dehydrator for a long time, and I couldn't find it on Amazon, but here is a similar one. I don't know if it holds the same volume as mine did. Rhonda had loaned me a rectangular one, similar to this, just in case, but I didn't need to use it. After grinding the wheat and making a large batch of bread, I actually should have dehydrated more than this, so I would have needed the two dehydrators. The trays in our dehydrator had wide slots that the wheat would have fallen through. We purchased some aluminum screen and cut out liners for each tray. I crimped up the edges to help hold the wheat on the tray. Then, I spread the wheat on the trays, only 2-3 kernels thick, and turned on the dehydrator. 
I thought that this step might take up to 2 days to complete, but they were totally dry in about 7 hours. We changed the trays around part way through the dehydrating process. Try biting a kernel from each tray to test to see if they are crunchy. Wet grain will gum up your wheat grinder!
Step 3: Grinding into Flour
There are many wheat grinders available on the market. I have a Magic Mill Grinder. You can find it on Amazon here. The hopper easily held the flour from my 9 cups of wheat. We also have a hand grinder like this one. It grinds a nice, fine flour, but that would have been a lot of cranking to grind 9 cups of wheat. The electric grinder made short order of it. 
Here is the wheat going down the hopper into the grinder. I noticed that the sprouted wheat even smelled differently as it was grinding than the regular whole berries normally do. It was a more mild, earthy odor.
And, Voila! Here is the wonderful sprouted wheat flour!

Once my wheat was ground, I wanted to bake my bread right away because that is when the nutritional value is at its highest. Come back for tomorrow's blog post when I will show you how I made the bread. I think Rhonda will be so proud of me! There were a few glitches, (which I will explain tomorrow), but over all this has been a wonderful success! It seems daunting at first, with a lot of steps. But, remember, each step only takes a few minutes to complete. (I mean, I saved my screen liners, so I won't have to make those again.) While each step happens, you can go on your merry way doing whatever you need to do! If you try it and taste the results, I think that you will convert to this method, too. Come back tomorrow to see the delicious results!
It is Valentine’s Day, and I am so glad it is almost over. Don’t get me wrong, you know that I am a romantic at heart, but let’s look at this time of year and everything that has happened since Christmas. After Christmas, there was New Year’s Eve. Many of our friends and family throw after the holiday parties, since there was no time for another party during the holidays. Then there was the Super Bowl, now Valentine’s Day and let’s not forget the various birthdays and anniversaries that have already happened. What do all of these events have in common? Food! If you are invited, you usually bring something to share. If you are throwing the party, you provide numerous snacks and treats. I am not complaining. I love food. But, I do get tired of the same old chips, dips, cookies and cupcakes. This year I searched and experimented to find some appetizers that are a little different from the norm, just to spice things up a bit and add something new to the mix.  In our family, most of us love bacon. My oldest son is notorious for loving bacon. Whenever you see a recipe on Facebook that features bacon, he will probably be tagged so he can see it because everyone knows he loves it. That is why when I received Jan D’Atri’s email telling me about Candied Bacon, I was intrigued. (If you recall, I shared Jan’s recipe for Stinky Pretzels a couple of months ago.) Jan’s Candied Bacon Recipe was made with beer. If you are okay with using beer in your cooking, her original recipe can be found here. There is also a recipe for Bacon Crack that looks delicious as well. We don’t use beer, so I decided to try the Candied Bacon with ginger ale. It is still an experiment in progress, but so far it has been a tasty, tasty experiment. Then, I started looking through the Panna site for some good appetizers and guess what I found? A recipe for Candied Bacon! They served it with Tomato Soup. You can go here to see the preview of the recipe and to subscribe. In the meantime, here is my experimental version of Ginger Ale Candied Bacon.  During the holidays, Adrian and Alicia were here with my adorable grandson, Adriancito. We have mentioned before that Adrian is from Ecuador, and he often cooks a traditional Ecuadorian meal for us when he is here. We shared Bolones and Cheese Bread (Pan de Yuca) in January. Bolones are made with plantains. When they returned home, they left a number of plantains behind. Luckily, they keep pretty well for some time. They look like bananas, but plantains must be cooked in order to eat them or they won’t be very enjoyable. Not wanting anything to go to waste, I began scouring the internet for some recipes to use them in. I found a simple and delicious one. Brown Sugar Fried Plantains are so easy to make and they taste so good. The yellow, sweet plantains are the ones I used. I simply cut them in thick, circular slices. I dredged them in brown sugar and fried them in coconut oil, browning them on both sides. The brown sugar caramelizes and the plantains become soft and everyone gobbles them up!  One day, I was checking out a link-up party and I came across this adorable recipe on Living on Cloud Nine for MIni Chicken and Waffles! I fell in love with this idea and had to make my own version for our own Valentines/My sons birthday meal. I want to try Andrea's homebaked chicken version at some point, but because I didn't have time this day, I just used chicken nuggets and Eggos. We served them with maple syrup on the side.  Here you can see the table runner I made, loaded with our Valentine's Day (early) / My son's birthday food. The final things that you can see in the background on the table are Pigs in a Blanket. Not really something new, but I made them small by cutting the Nathan's Hot Dogs in half and wrapping them with canned biscuits and then baking them. Then we served them with dipping sauces and condiments. They were surprisingly filling. Some of the other things you can see on our table are watermelon hearts and Blackberry Lemon Bars that I showed you last week.   Well, even though Valentine's Day will soon be behind us, it won't be long until the next event comes our way! We are already thinking about St. Patrick's Day, lots of birthdays and Easter to mention a few. Don't get in a rut with your food! Do something a little different! Try a new recipe, make one up and add a little spice to your life.
|
Creators of Hot Cocoa Bombs! (copyrighted)

Author
Helen Reynolds: Mother of six children , grandmother to eleven! I love to cook, craft and create things and I especially love doing that with my family, So, when my lawyer daughter, Lindsey, my artist daughter, Madalynn, and I came up with the idea of Hot Cocoa Bombs, this blog was born. Then, one more daughter, with her technical and science skills, plus creativity has joined in to round us out! Read more about us here! 
Click this link and visit 3WinksDesignShop on Etsy. Find our Hot Cocoa Bomb Idea Book, our For the Love of PIe e-book and more of our creations!

Amazon Gift Cards are the Perfect Gift!
    Archives
June 2024
|


 RSS Feed